Table of Contents
As an app marketer, who knows the better implications of Google Play Console than you? Although most of us have used Google Play Console to publish an Android app or create a store listing on Play Store, there is a lot more Google Play Console has to offer. It is especially beneficial for those focused on improving the performance and quality of their business app.
With hundreds of apps publishing every day, there has been fierce competition to be at the top of the charts. In such a situation, app marketers should have hands-on experience with Google Play Console to ensure their app stands out and makes a difference in an ocean of competition.
If you’re an app marketer starving to understand the nitty-gritty of Google Play Console, we have come up with this ultimate guide. In this guide, we will introduce you to every aspect and feature of Google Play Console. Once you become familiar with the effective use of Google Play Console, you can cement the chances of your app’s success in this competitive world.
Chapter 1: Getting Started with Google Play Console
Before we sign up for Google Play Console and get started, it is essential to have an in-depth understanding of what exactly it is and how it works. So, here’s a quick introduction to Google Play Console.
What is Google Play Console?
Google Play Console, or Google Play Developer Console is an advanced tool that lets Android app developers and app marketers publish, update, or market their Android apps on Play Store. That is what you probably know already. Now the most interesting thing about Google Play Console is that it is more than just a tool for promoting final app drafts on the Play Store.
In fact, it is a management tool that offers valuable data insights on the app’s performance. The data is derived from Google and is available on the dashboard. Now, this data is beneficial for both developers and app marketers.
Using the KPIs, app developers can modify the code and optimize the app according to the users. Meanwhile, app marketers can use different marketing tactics and optimize the app description to enhance its reach among a wider audience.
What makes Google Play Console a complete developer tool is the availability of filters based on region, devices, ratings, and more. Also, there is a production tab, a reviews section, a testing tab, and an app bundle explorer.
Step-by-step Process on Creating a Google Play Developer Account
To get started with Google Play Console, you’ll first need to set up a Google Play Developer Account using the steps below:
Step 1: Sign Up for Developer Account
- Sign up using your existing Google account or create a new one.
- After signing up, you can use your developer account to publish and manage your Android app on the Play Store.

Step 2: Review and Accept the Developer Distribution Agreement (DDA)
- During the sign-up process, you will be asked to accept the Developer Distribution Agreement, read it carefully, review it, and then accept it.
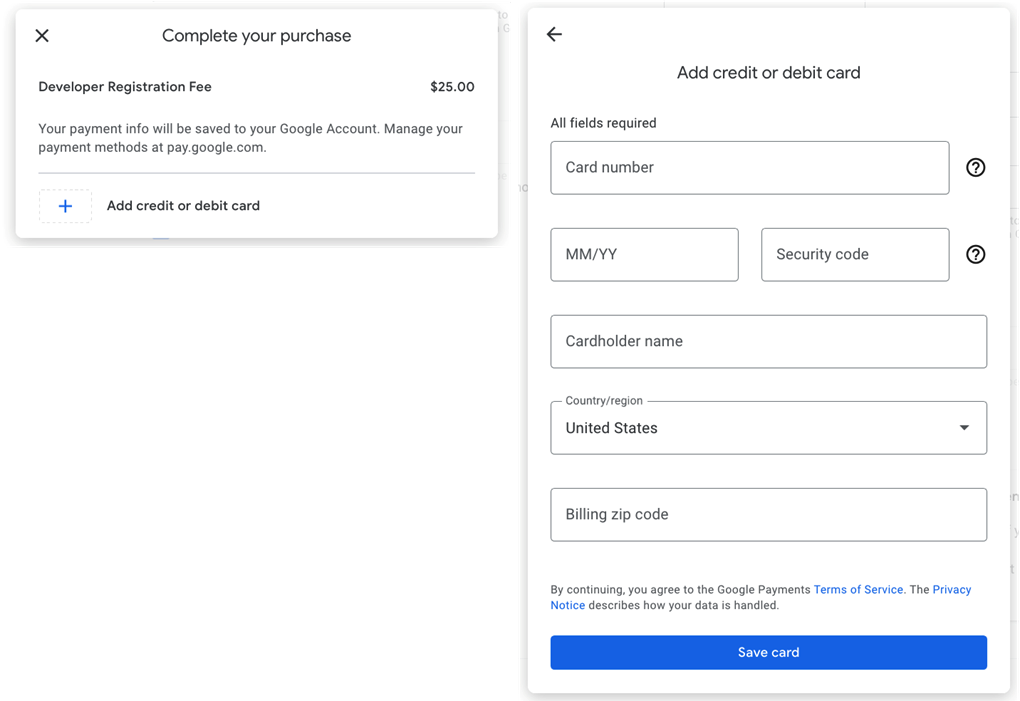
Step 3: Pay the Registration Fees
Now, you will have to pay the one-time registration fees for using Google Play Console services. You can pay the registration fees using the following payment options:
- MasterCard
- Visa
- Discover
- Visa
- Electron
- American Express
Step 4: Complete Your Account Details
Choose between the account type and fill in the details based on your selection:
For Personal Account
- Developer Name
- Verified contact email address
- Communication Address
- Verified phone number in International format
- Website
For Organizational Account
- Developer Name
- Organization Name
- Verified contact email address
- Communication Address
- Verified phone number in International format
- Organization’s website
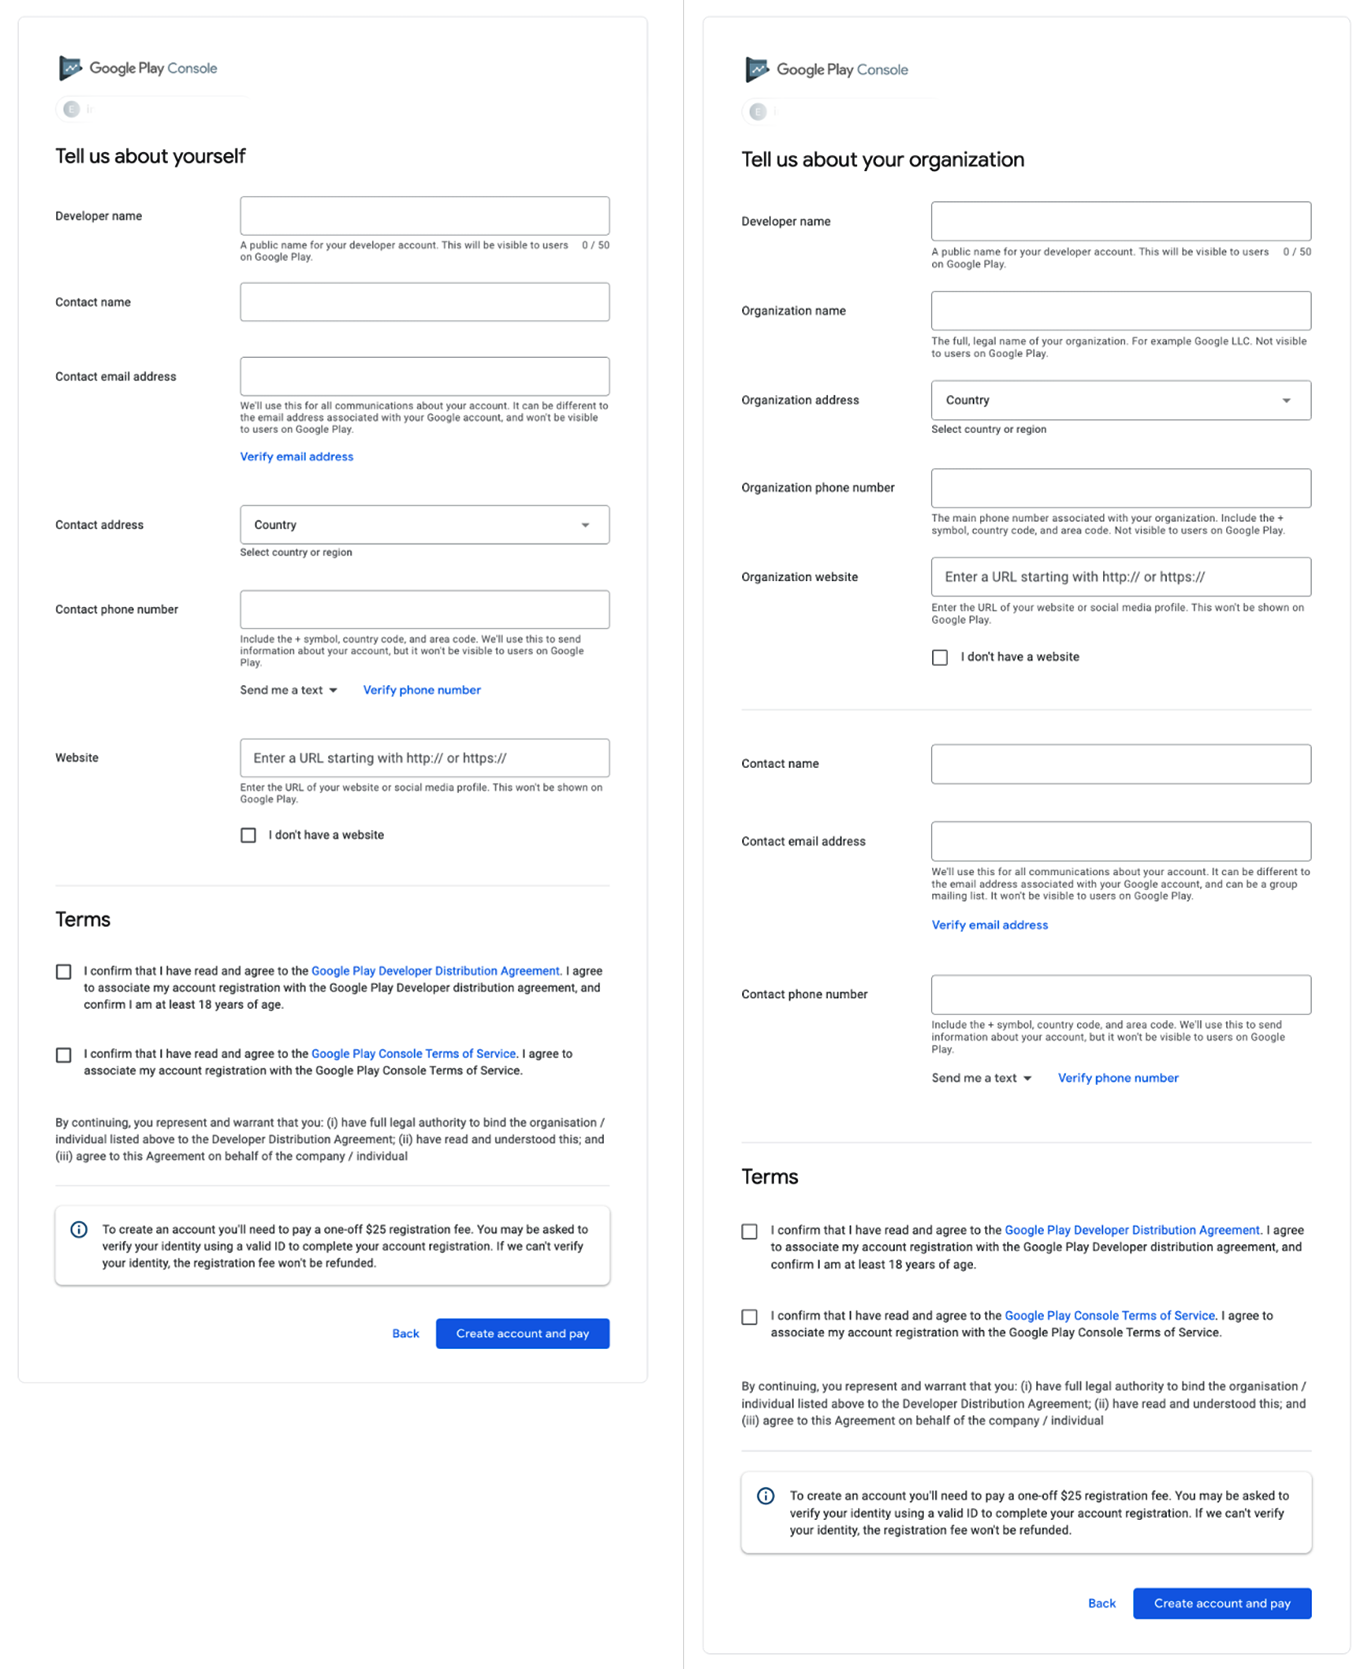
Accept the terms & conditions and continue to create your Google Play Developer Account.
Chapter 2: Navigating Google Play Console
Once you are logged in to your Google Play Developer Account, you will be redirected to a personalized dashboard. You will find many other useful sections in your dashboard.
Here’s a look into the key sections of Google Play Console:
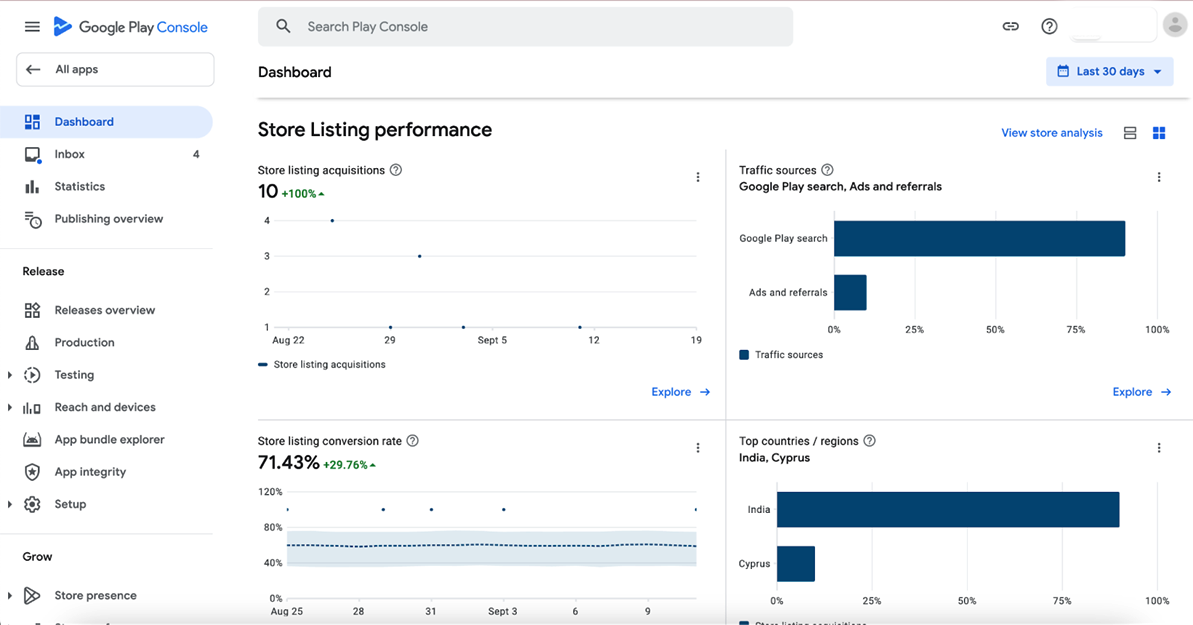
Main Dashboard
As soon as you log in to your account, you get to see all your management data on the main dashboard. There is an overview of KPIs and other sidebars with more options. The dashboard gives detailed insights into your app performance.
Here, you will find key performance indicators (KPIs), listing performance (traffic sources, conversion rates, highest-performing locations, etc.), ratings, average daily app installs, app size, and Android vitals.
As an app marketer, you should know how to use this information for maximum results. Regularly check the KPIs to make informed decisions regarding your app.
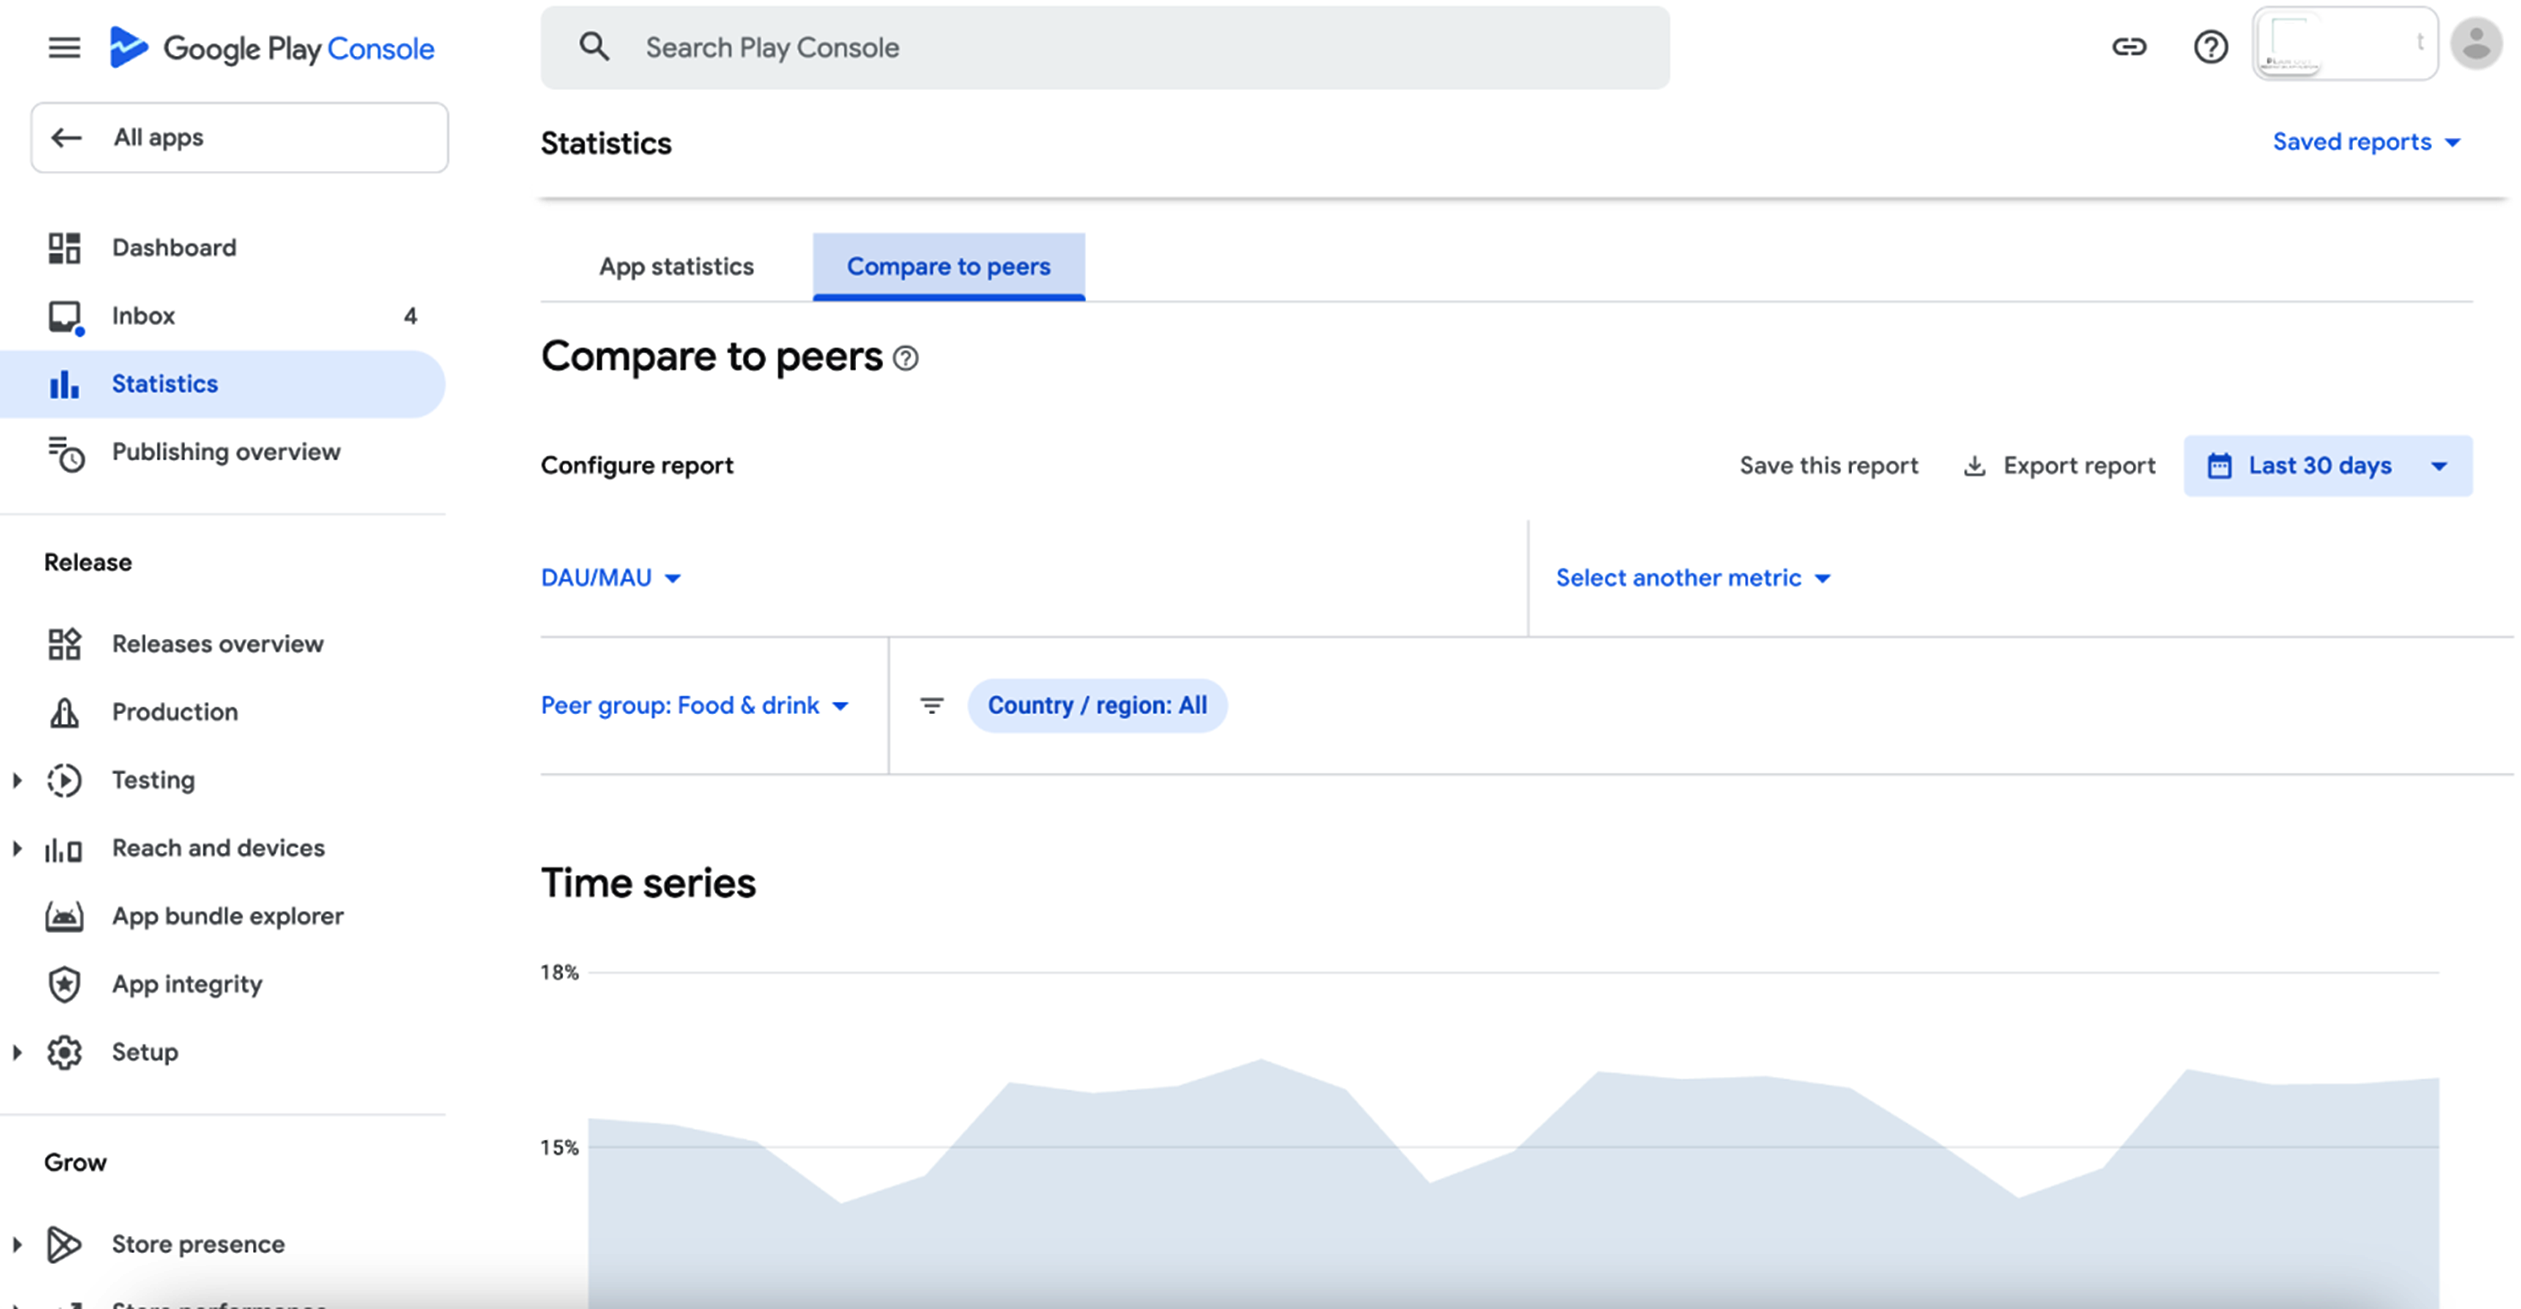
The Statistics section offers an in-depth look into the performance of your app using diverse data points and filters. You can export the report to see two data points and compare them with the past time. You can apply the following filters:
- Users – Installed, user acquisition, and user loss
- Devices – Install base, device loss, device acquisition, device updates, install events and uninstall events.
- User Engagement – Daily active users (DAU), Weekly active users (WAU), and Monthly active users (MAU).
- Ratings – Google Play rating.
- Quality – ANRs, crashes, app size on the device, app download size.
- Pre-registration – Users and conversions
- Store Listing Performance – Acquisitions and visitors
Apart from these, you can use additional core filters like
- Country or region
- Language
- App version
- Android version
- Device
- Device type
- Carrier
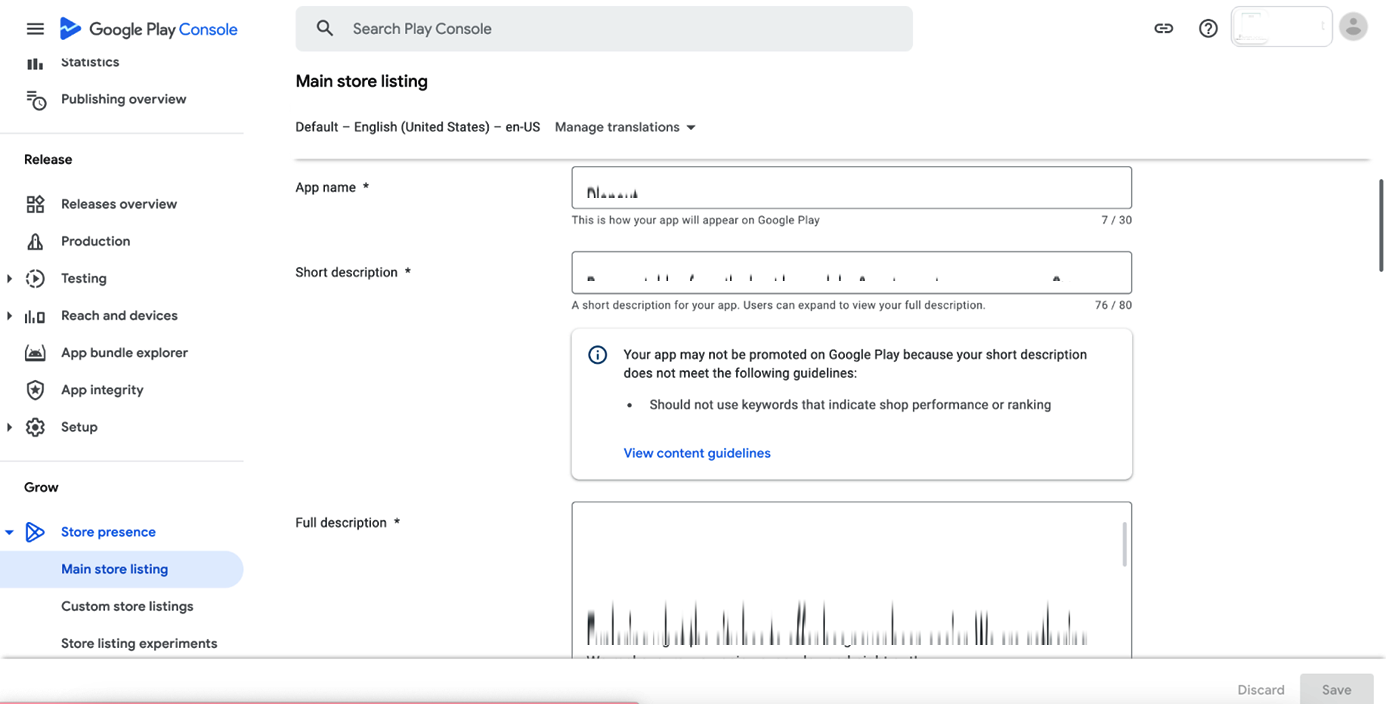
Store Listing Section
Under the Store Listing section, you can perform a variety of functions, including the main store listing, store listing experiences, custom store listing, LiveOps, translation, and store setting.
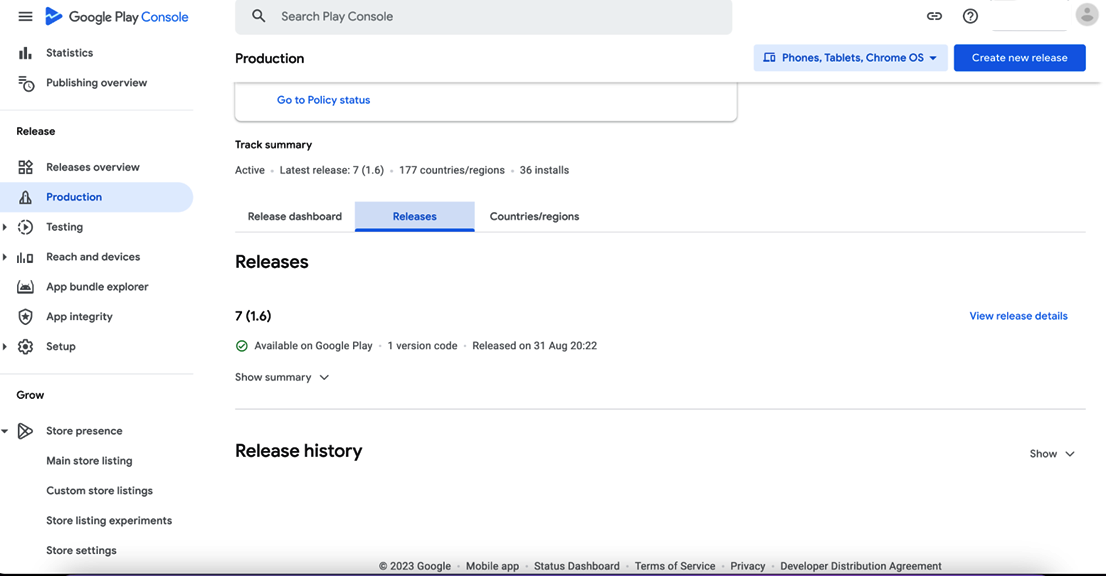
Release Management Section
The Release Management section helps developers with all the necessary steps required before finally publishing the app. These steps include
- Releases overview across different tracks
- Production
- Testing
- Pre-launch Report
- Device Catalog
- App Bundle Explorer
- Setup
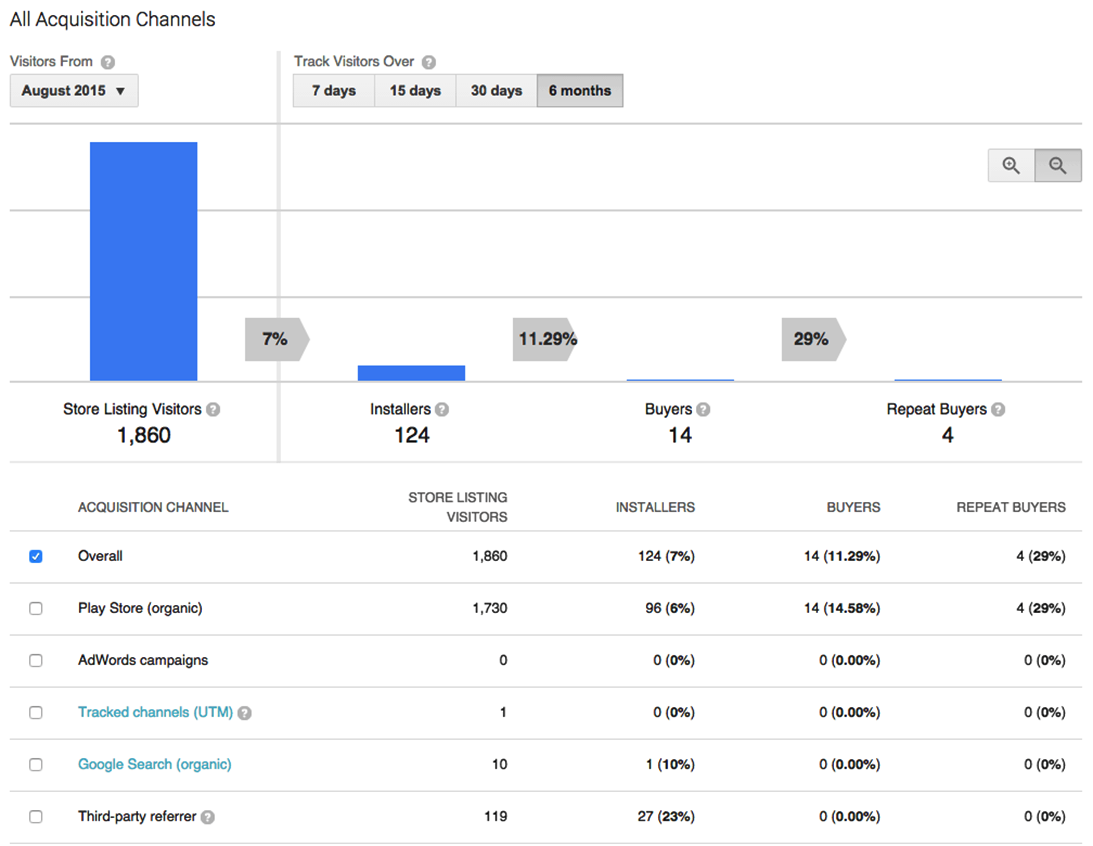
User Acquisition Section
This section in Google Play Console allows you to keep track of ad campaigns and user acquisition channels. You can experiment with different ad campaigns to optimize user acquisition. However, it is advisable not to overspend on advertisements without calculating their ROIs.
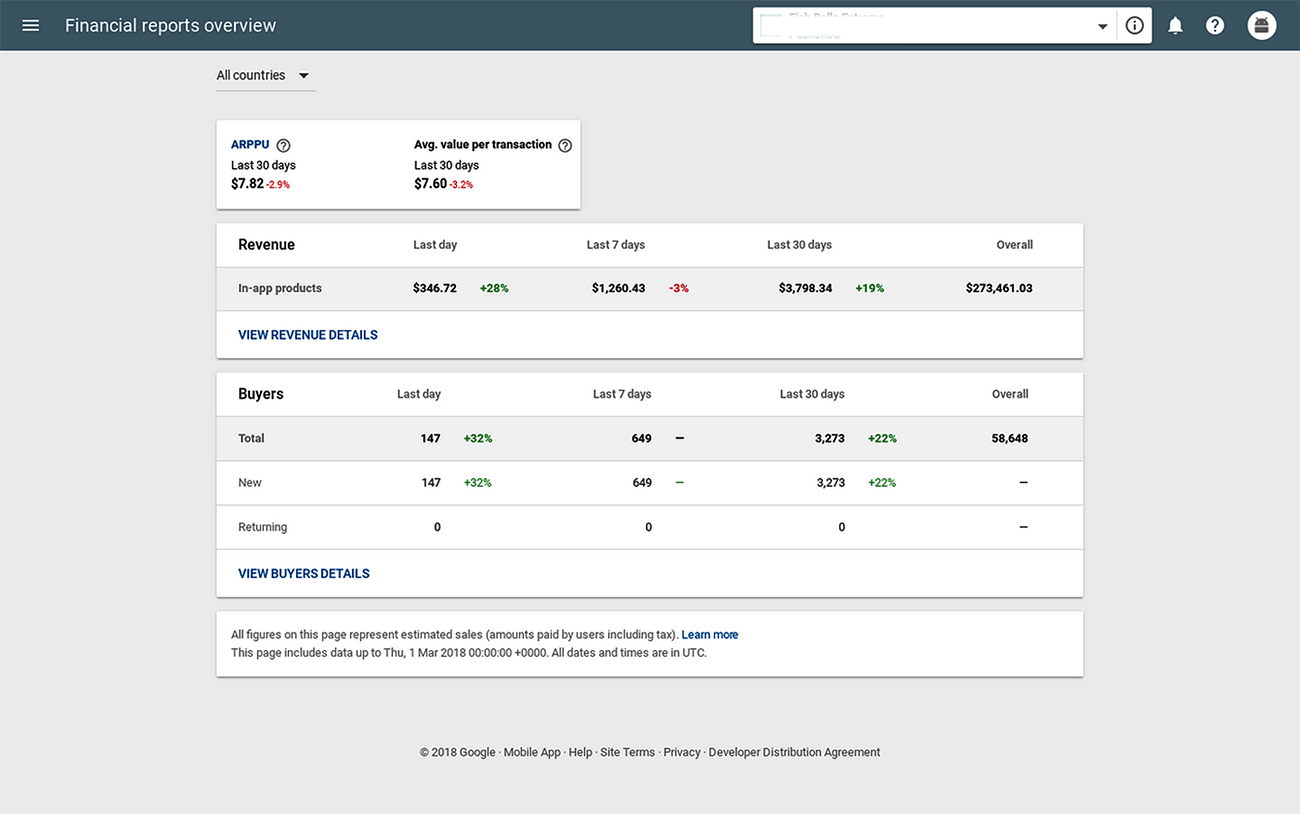
Financial Reports Section
The section allows developers and app marketers to view the revenue generated from the app and its performance in terms of sales. You can track your app’s revenue to adjust your monetization strategies accordingly.
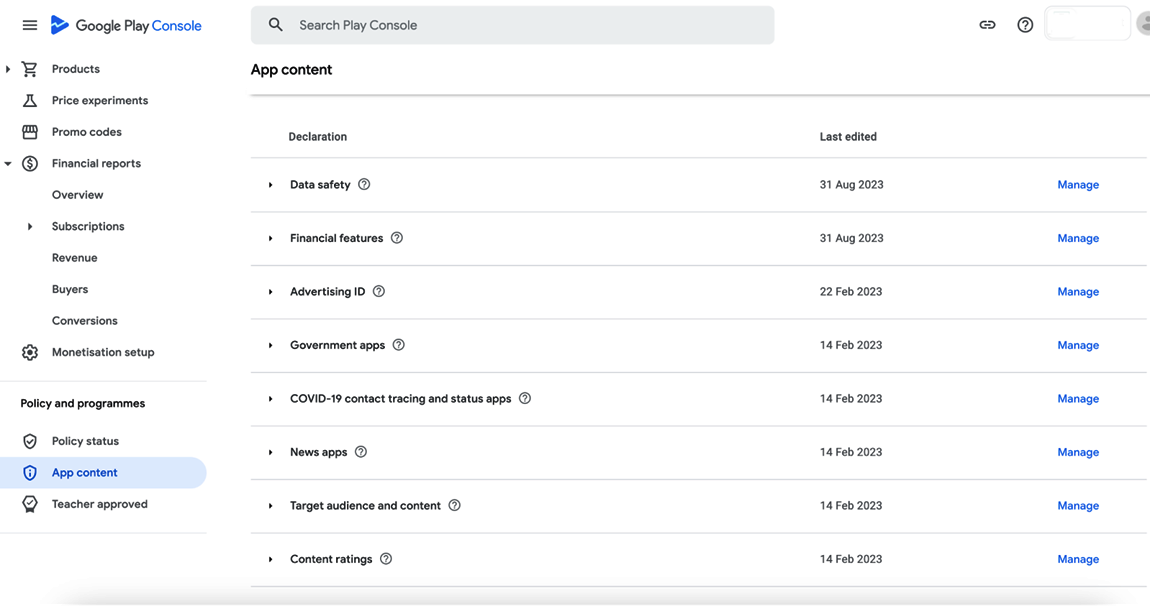
Policy Section
In this section, you will get information about the Google Play policies. As these policies keep on updating timely, you will need to review and update your app to comply with these policies. Remember, any violation of these policies will result in a permanent ban on your mobile app.
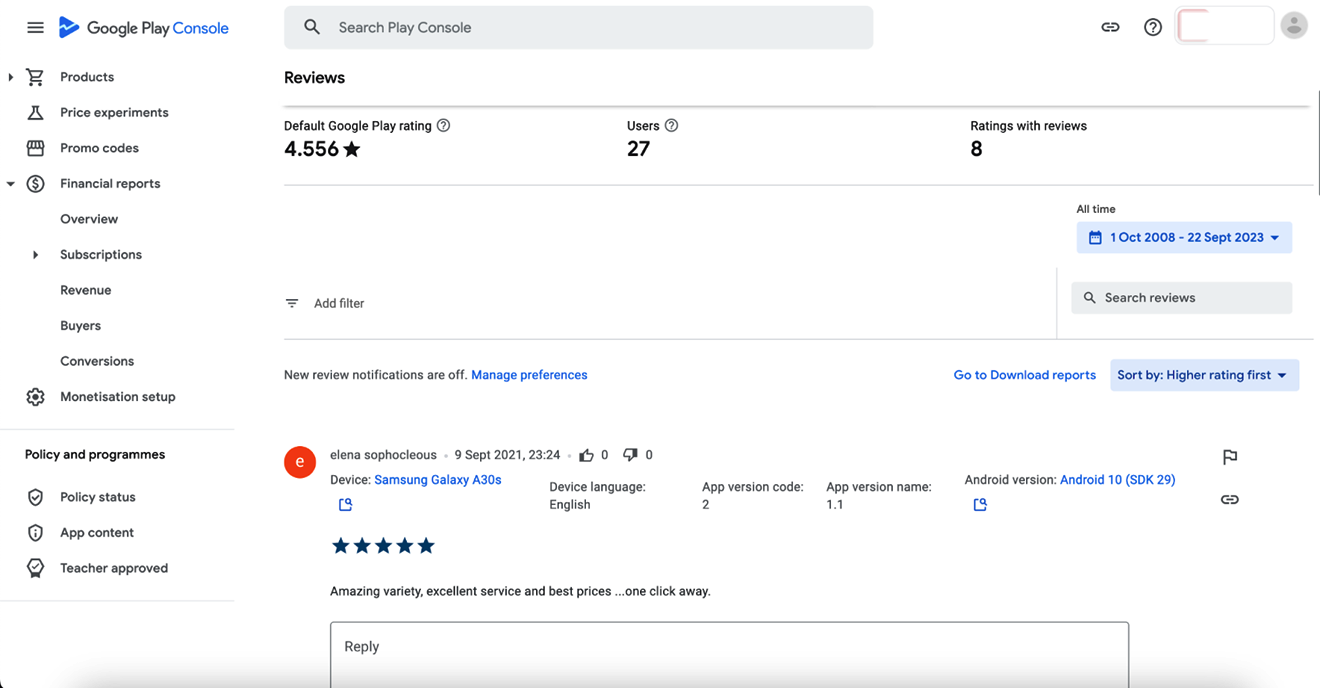
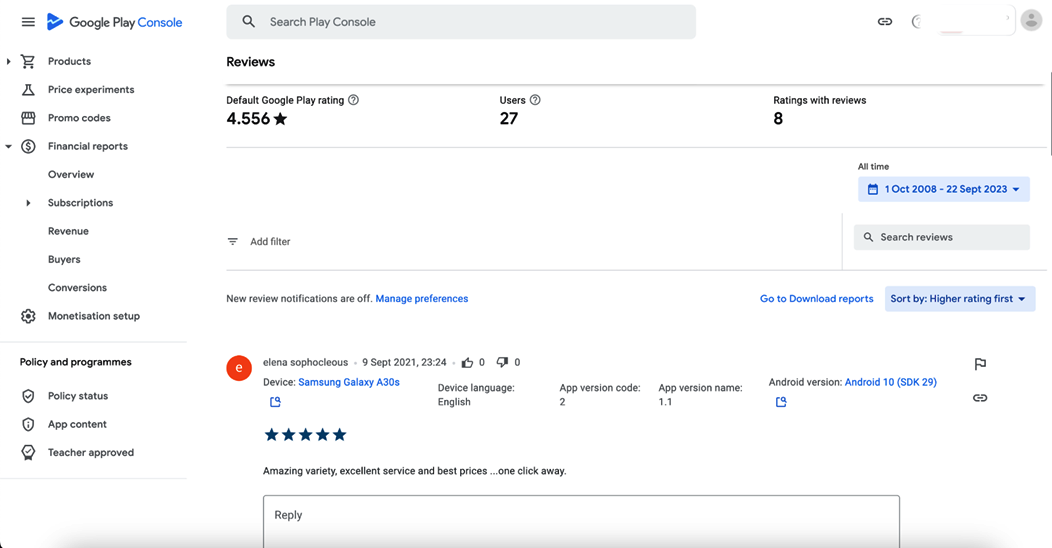
Reviews and Rating Section
You can get insights into the user ratings, review analysis, and testing feedback on your app. To ensure your app remains competitive, respond to user feedback promptly, both positive and negative.
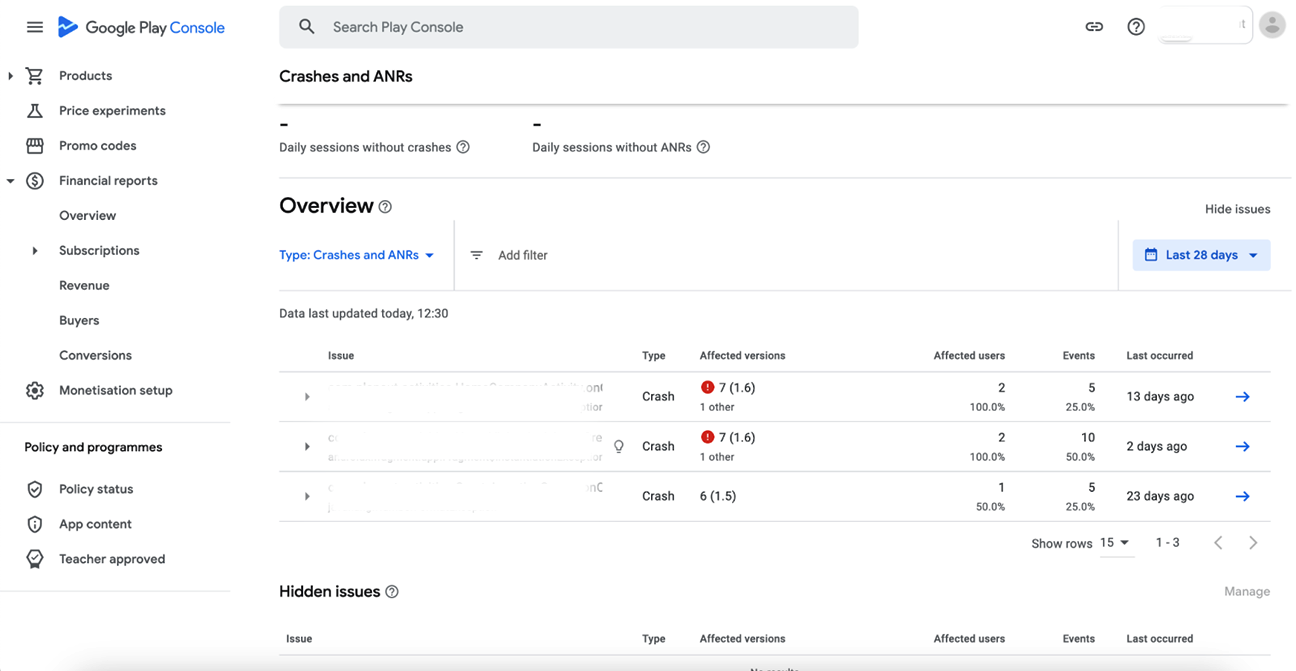
Crashes and ANRs Section
The section allows you to get insights into the app crash and performance issue data. You can identify the pitfall and address the issue promptly to offer a better user experience.
User Feedback Section
It allows developers to analyze the user feedback and suggestions on the app. This greatly helps in prioritizing the feature development and improvement for the app’s better reach to users.
Localization Section
This section in Google Play Console helps in managing regional optimizations and app translations to help extend your app’s reach to a wider audience. However, it is advisable not to depend solely on automated translation tools.

Chapter 3: App Listing Optimization
With nearly 3 million apps on the Google Play Store, it becomes challenging for new apps to survive and get noticed by potential users. That’s where App Store Optimization (ASO) can help app marketers to stand out their apps in a crowded marketplace. With the emergence of new technologies, ASO strategies have been evolving into must-haves for app publication.
Elements of App Store Optimization (ASO)
- Google Play Metadata Optimization: The keywords used in metadata, including titles, and short and long descriptions are indexed in a hierarchical format. Understanding the frequency and density of the keyword is essential for app marketers.
- App Title: The keyword in the app’s title carries the most weight. You can write the app title in up to 30 characters including space and special characters.
- Short Descriptions: With the app’s title having limited space, the importance of short descriptions increases significantly. You can write short descriptions in up to 80 characters.
- Long Descriptions: When users click to read more, they can learn about your app in depth. The character limit for writing long-term descriptions is capped at 4000 characters.
- App Icon: The creativity in your app icon design has a huge impact on its success. This is the first element a user sees in your app.
- App Screenshots: The screenshots of your app will give users an idea of its look and feel. It also promotes a huge adoption among users.
Promo Video: You can also publish a promo video of your app to describe the features and functionalities of your app.
A/B Testing on Google Play
Google Play Console has a built-in A/B testing platform that lets developers experiment with different elements of their app store listing, such as icons, feature graphics, screenshots, videos, short descriptions, long descriptions, or a combination of any of them.
Developers and app marketers can compare up to 3 alternatives with the current version and test them in up to 5 markets simultaneously.
Here are a few recommendations on A/B testing to improve conversion rates:
- Test for a minimum of 7 days.
- Don’t test brand-new assets.
- Test it locally.
- Monitor the outcomes rigorously.
Chapter 4: App Release and Updates
After you are done with App Store Optimization, it is time to release your app on the Google Play Store. Below is a step-by-step guide on Android app submission on the Play Store.
Step-by-step Guide for App Submission
Step 1: Set Up a Google Merchant Account
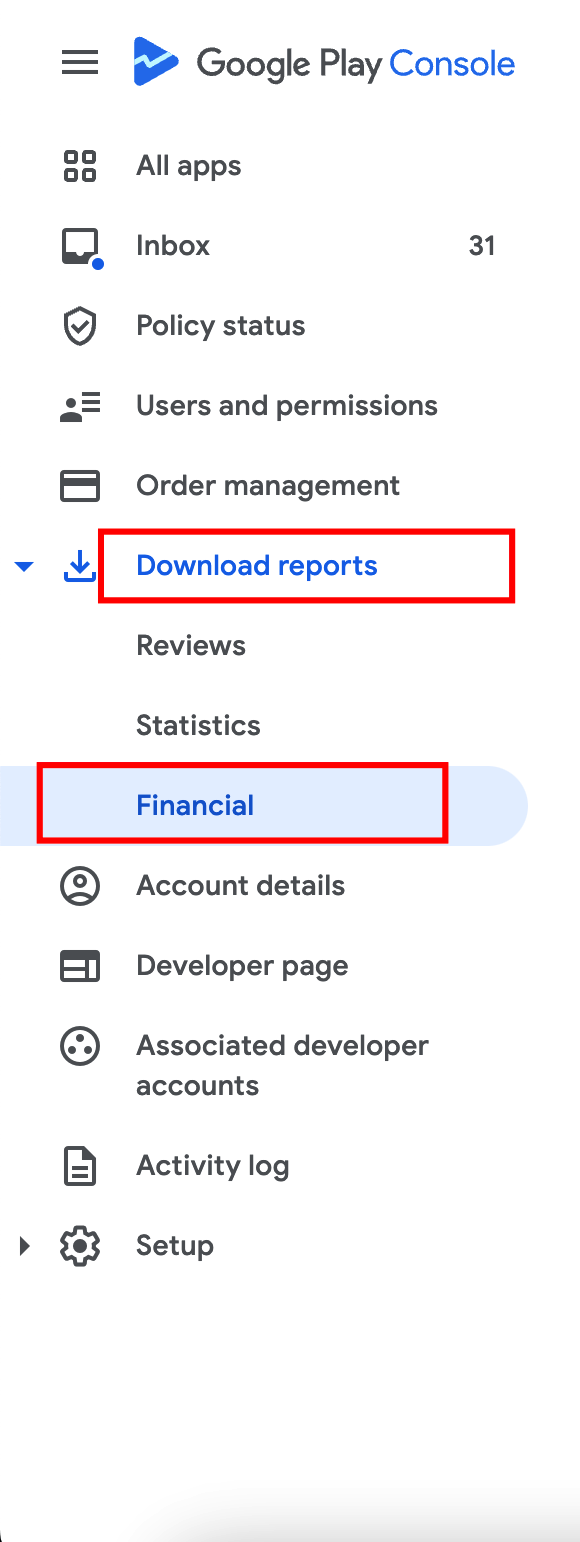
If your app has in-app purchases, you will need a merchant account linked to your Google developer account. If you already have an account, navigate to the Download Reports section and then Financial.
Step 2: Create App
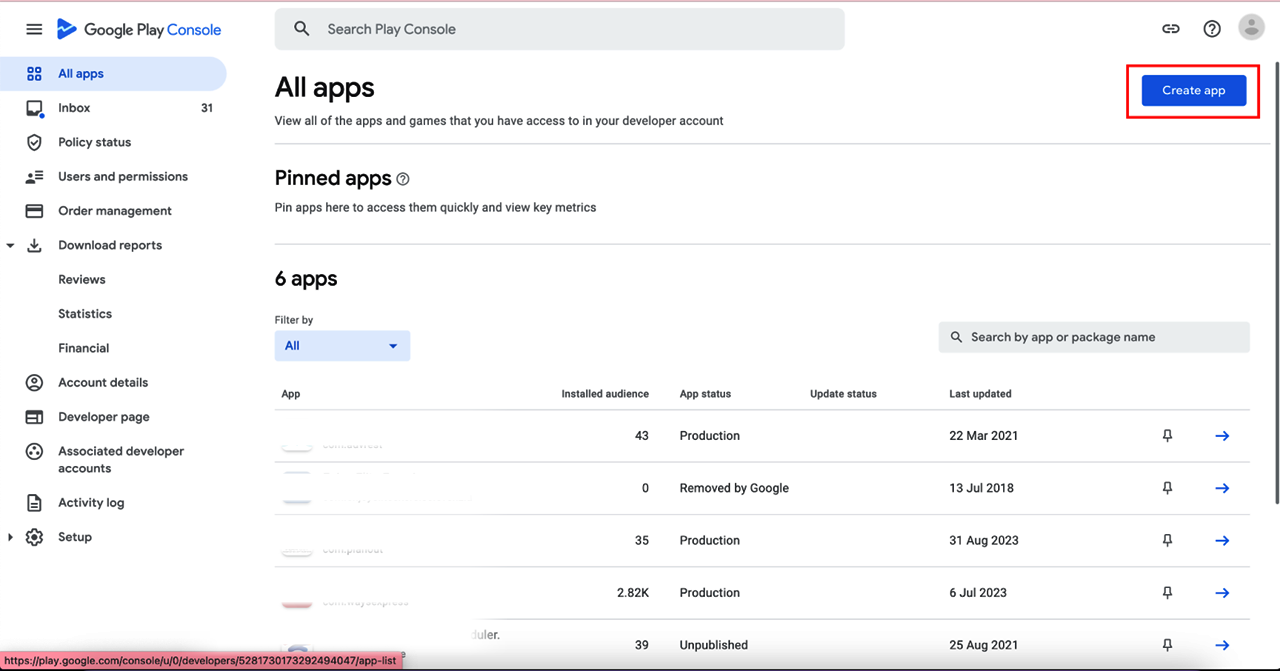
Once your merchant account gets linked with your developer account, the next step is to click on the ‘create an app’ icon. Follow the steps below:
- Tap on – Menu > All applications
- Choose the ‘Create Application’ option.
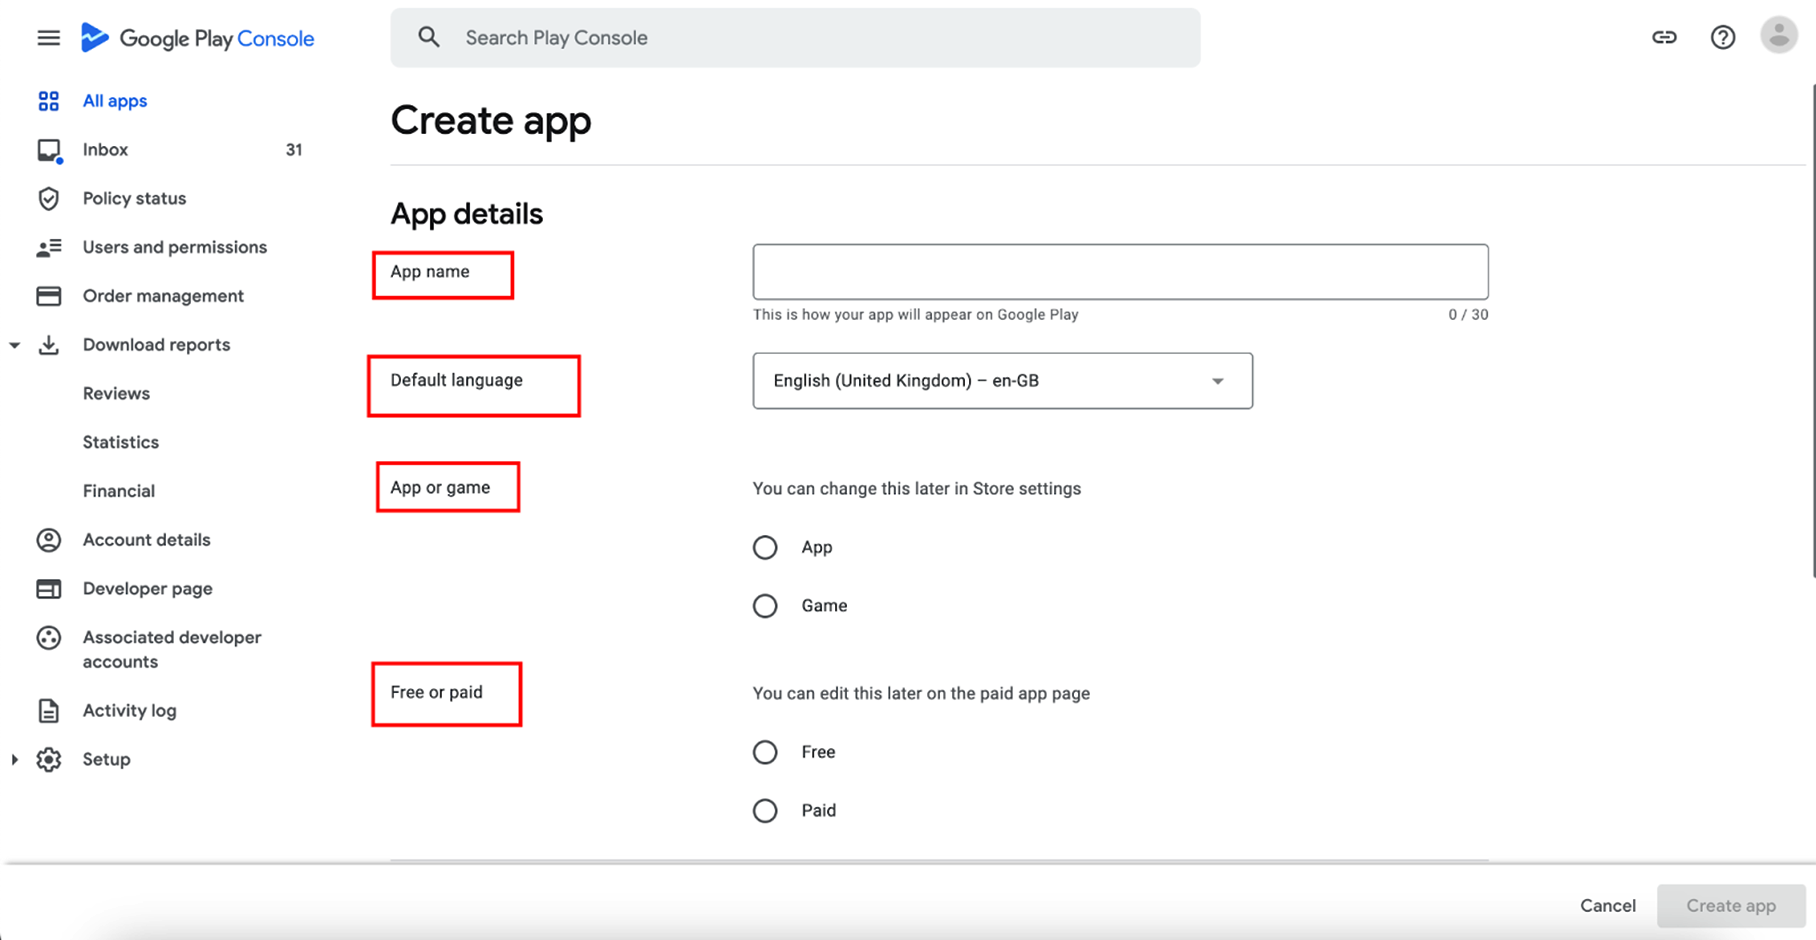
Next, give some basic information about your app including:
- App name in 30-character.
- Default language.
- App or game.
- Free or paid.
Step 3: App Store Listing Details
Now, fill in the essential information required by Google Play Console for app uploading. After clicking on the ‘Create an App’ icon, you will redirected to a consolidated dashboard. You will need to enter the following details to set up your app:
- App name
- Short description in up to 80 characters.
- Full description up to 4000 characters.
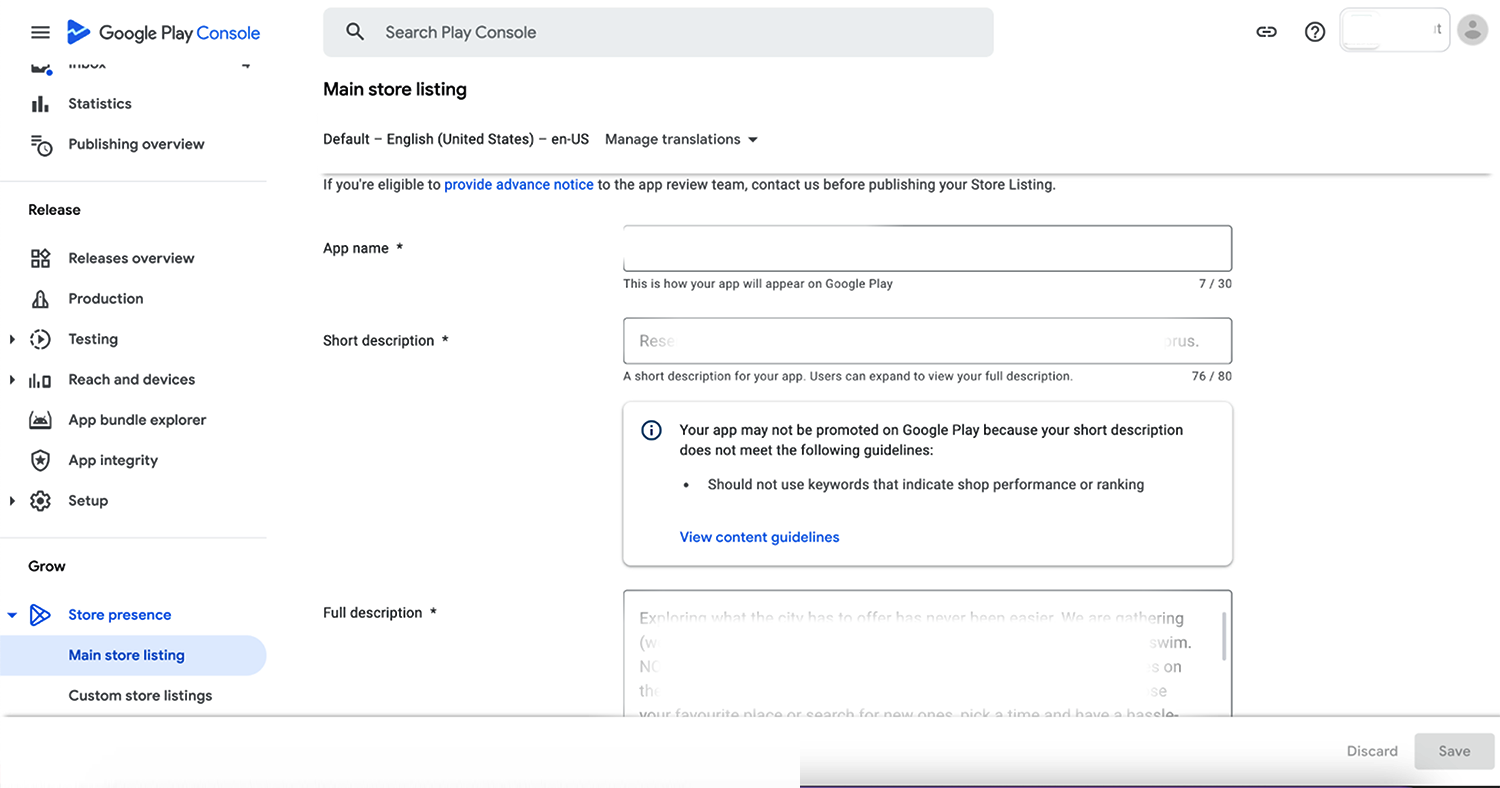
After that, you will need to add the graphics, category, and privacy policy of the app. Here’s what you will need:
- Screenshots – 2 to 8 in number, JPG, or PNG
- Icon – 512 X 512 (PNG) Maximum file size: 1024KB
- Localization
- App Type and Category
- Contact Details
- Privacy Policy
After entering all the details, tap on the Save button.
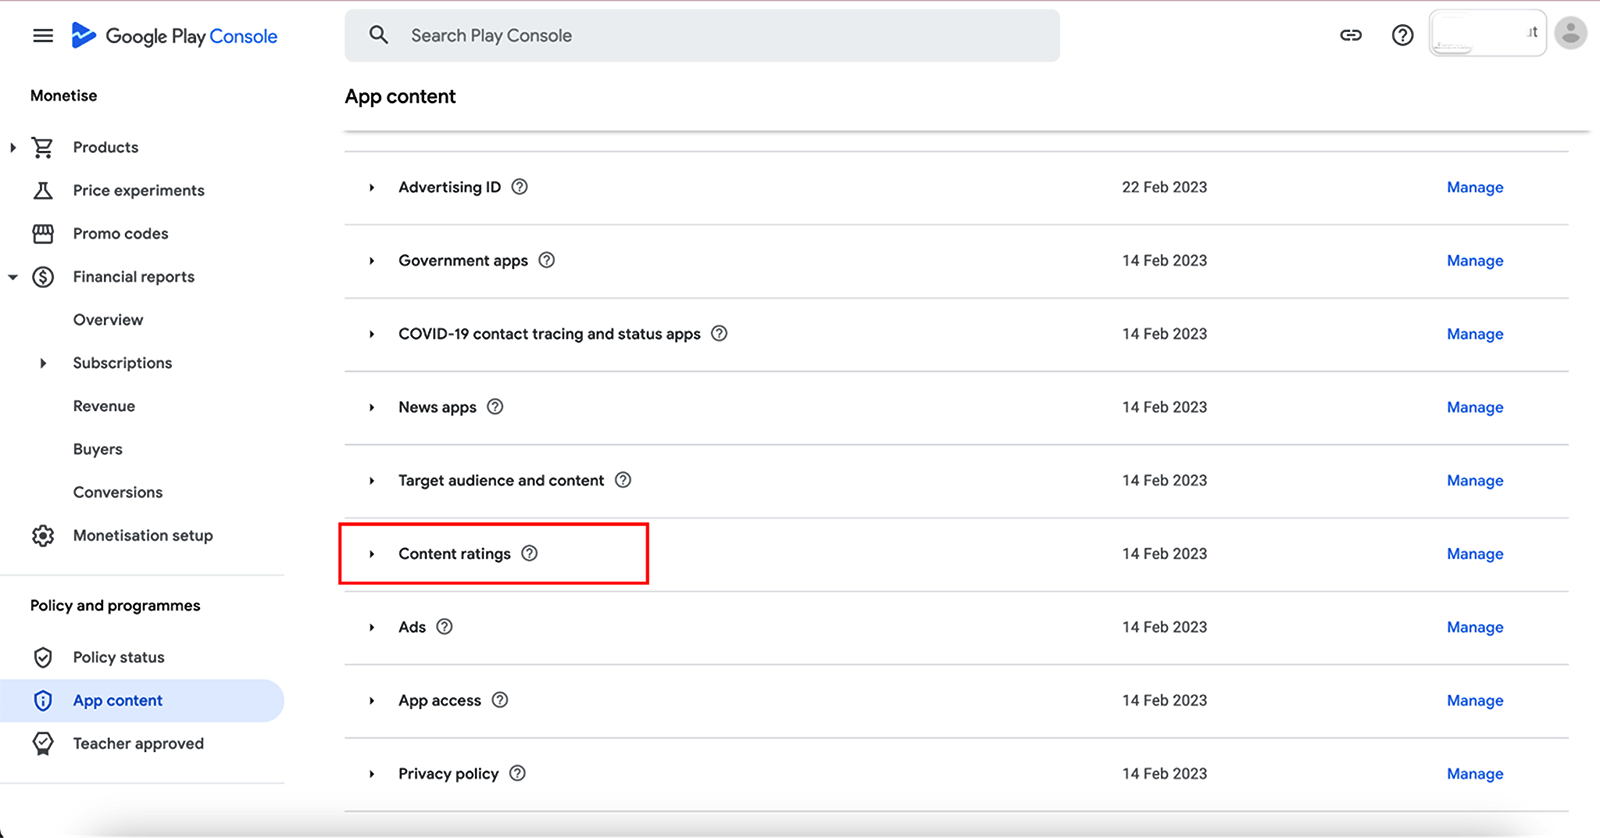
Step 4: Content Rating
A content rating questionnaire is the most important step for publishing your app on the Google Play Store. If you don’t rate your app’s content, Google will treat it as an Underrated app and remove it from the store. To avoid this situation, you need to follow these steps:
- Go to the main dashboard, set up your app, and choose the Content rating option.
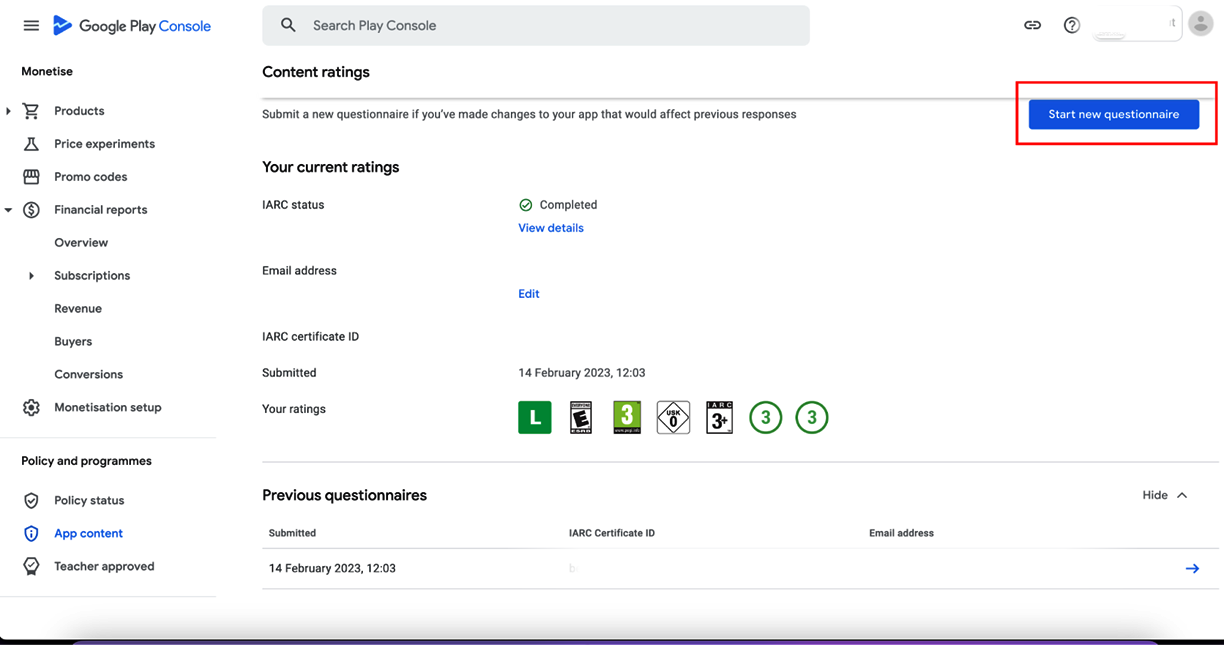
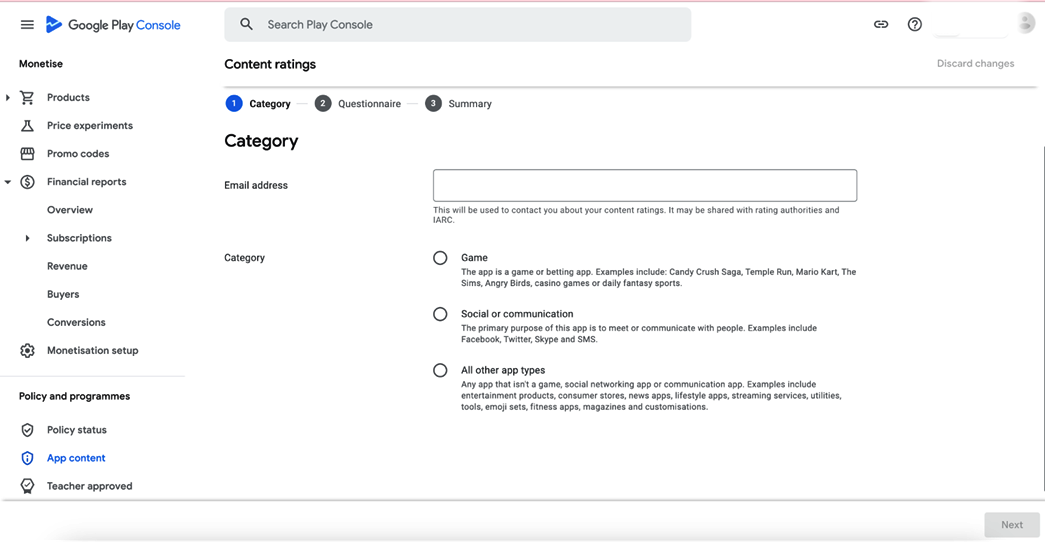
Click on the “Start Questionnaire” button and fill in the basic information about your app, such as your email address and the app category.
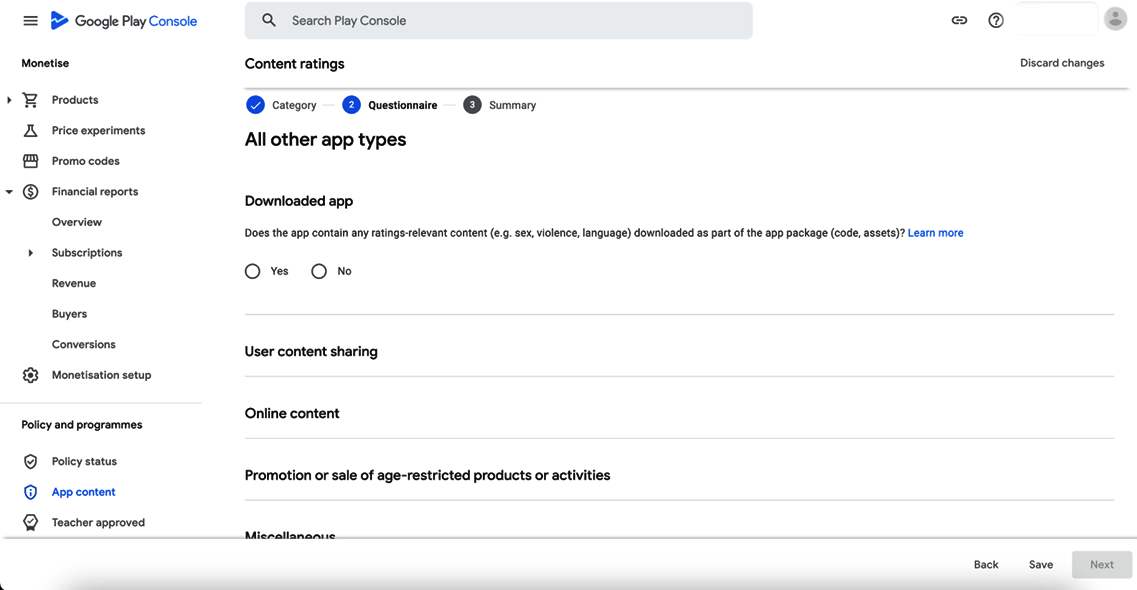
Answer the questions that Google asks you to learn more about your app and its target audience.
Review the content rating summary and click ‘Submit’ to save the changes.
Step 5: Upload your Android App to the Google Play Store
The first step to publish your app on the Google Play Store is to upload the APK to the Google Play console, where Google will review it and make it live.
Before you upload the app, you need to choose the type of app release – Internal Test, Close Test, Production Release, or Open Test – depending on how many testers or users you want to reach.
After you choose the testing, you can go to the dashboard and click on “Create a new release.”
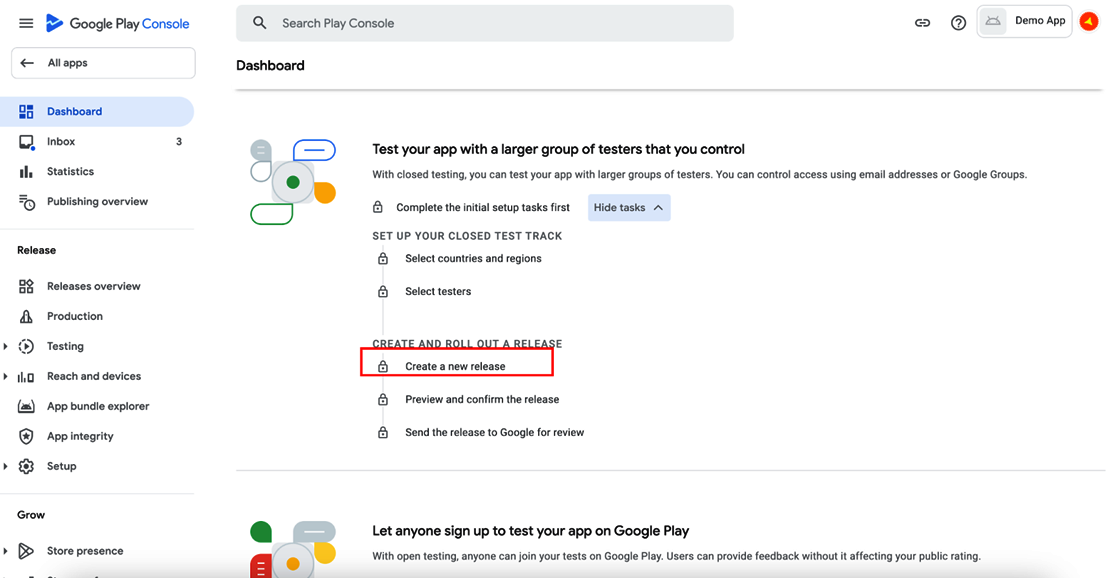
Then, you will upload the app bundles and the release details and confirm that everything is correct.
Next, you will go to the ‘App Releases’ tab and select ‘Manage Production’ and ‘Edit Release’. Then, you will click on ‘Review’ and ‘Start rollout to production option’.
Finally, you will click on ‘Confirm’ and your app will be uploaded to the Google Play Store for free.
You will have to wait for Google to approve your app, which can take from a few hours to 7 days. You should be ready for both successful publishing and any revisions if needed.
Best Practices for Updating Your App
The app publication on the Google Play Store doesn’t guarantee its success; you will need to keep your app relevant and updated to get all the exposure it deserves. Here are some of the best practices for updating your Android App:
- Make sure users have the latest version: Updating apps regularly is advised to protect users from security risks and offer them the newest features.
- Keep User Preference on the Top: Google Play only updates apps that are linked to users’ accounts and follow their update settings, such as enabling or disabling the use of metered data.
- Respect Developer Preference: Google Play respects the developers’ configuration choices when deciding on app updates.
- Save Resources: Preserve battery life by choosing the best time to download updates, and reduce data consumption using techniques like compression and patching.
Chapter 5: User Acquisition and Retention
Your app is made for people and if they are not downloading it, what’s the point of developing it? You will need user acquisition and retention strategies to ensure your app reaches a wider audience.
Here’s how you can ensure higher user acquisition and retention:
App Promotion with Google Play Console
According to research, the chances of your app success increase by 56% if you choose robust promotional strategies. With promotions in Play Console, you can offer users a free paid app, in-app product, or subscription with a promo code.
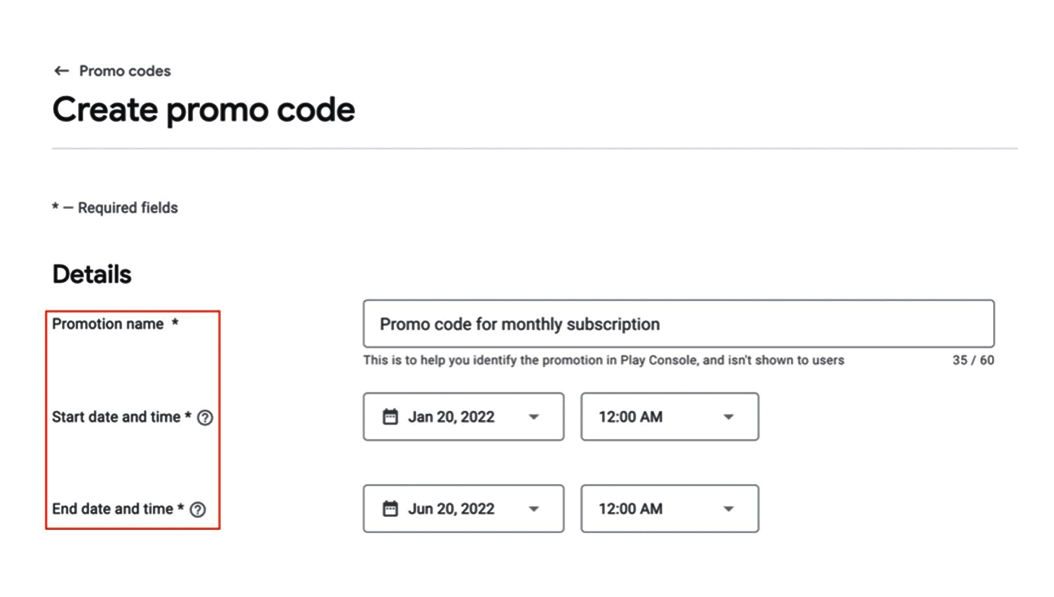
There are two kinds of promo codes available:
- One-time Use Codes: These are unique codes that are generated automatically and can be used once. Users can use one-time use codes directly from Google Play or in-app.
- Custom Codes: Custom codes are those that you create and that can be used multiple times or up to your set limit. Users can only use custom codes in-app. Custom codes are only for subscriptions and only for users who have not subscribed before. You must explain the eligibility criteria for promotions to your users.
User Behaviour Analytics to Improve Retention
According to a survey, 21% of Millennials use an app more than 50 times a day. Almost half of the people use an app at least 11 times a day. Mobile apps account for 70% of the total digital media time in the US. In such a situation, analyzing user behavior can help a lot in improving retention.
User behavior is how users act and react when using your app. By measuring and analyzing user behavior, you can understand what users value and how to enhance their experience.
User behavior looks at metrics like signups, activation rates, feature usage and impact, funnel drop-off for in-app purchases, and retention rates.
Using user behavior data will help your team be customer experience-driven. You will learn to base your product development and product marketing decisions on data, not assumptions.
Chapter 6: Reviews and Rating Management
There is no chance that your mobile app will perfectly align with everyone’s requirements. Some may find it the best, others may have complaints over its features or functionalities. However, as an app marketer, you should better know how to handle reviews both negative and positive.
Monitoring User Reviews
According to a survey, 88% of people have admitted that reviews impact their buying decisions. Every 9 out of 10 people read a review about the product before buying it. In such a situation, monitoring the user reviews and working on them becomes even more important for the success of your app.
Google Play Console lets you view a summary of your app’s ratings, user feedback, and grouped data about your app’s reviews. Users can give your app a star rating and review on Google Play.
Users can rate an app only one time, but they can change their rating or review whenever they want. By accepting this feedback and working on these loopholes, you can ensure the maximum success of your Android app.
Responding to User Reviews
With the Google Play Developer Reply to Reviews API, you can see user feedback for your app and respond to it. You can use this API to communicate with users directly within your CRM system.
The Reply to Reviews API lets you access feedback only for production versions of your app. If you want to access feedback on alpha or beta versions of your app, you should use the Google Play Console instead.
Also, remember that the API only displays the reviews that have comments. If a user gives your app a rating but does not write a comment, their feedback is not available from the API.
Chapter 7: Revenue and Monetization
This chapter will show you how to generate revenue and monetize your app using the Google Play Console. We will discuss two main ways: in-app purchases and subscriptions, and ad revenue.
In-app purchases and Subscriptions
In-app purchases and subscriptions are ways to sell digital goods or services within your app. You can use the Google Play Billing Library to integrate these features into your app and manage them in the Google Play Console.
In-app purchases allow users to buy one-time or consumable items, such as coins, power-ups, or extra lives. Subscriptions allow users to access recurring content or services, such as premium features, music streaming, or cloud storage.
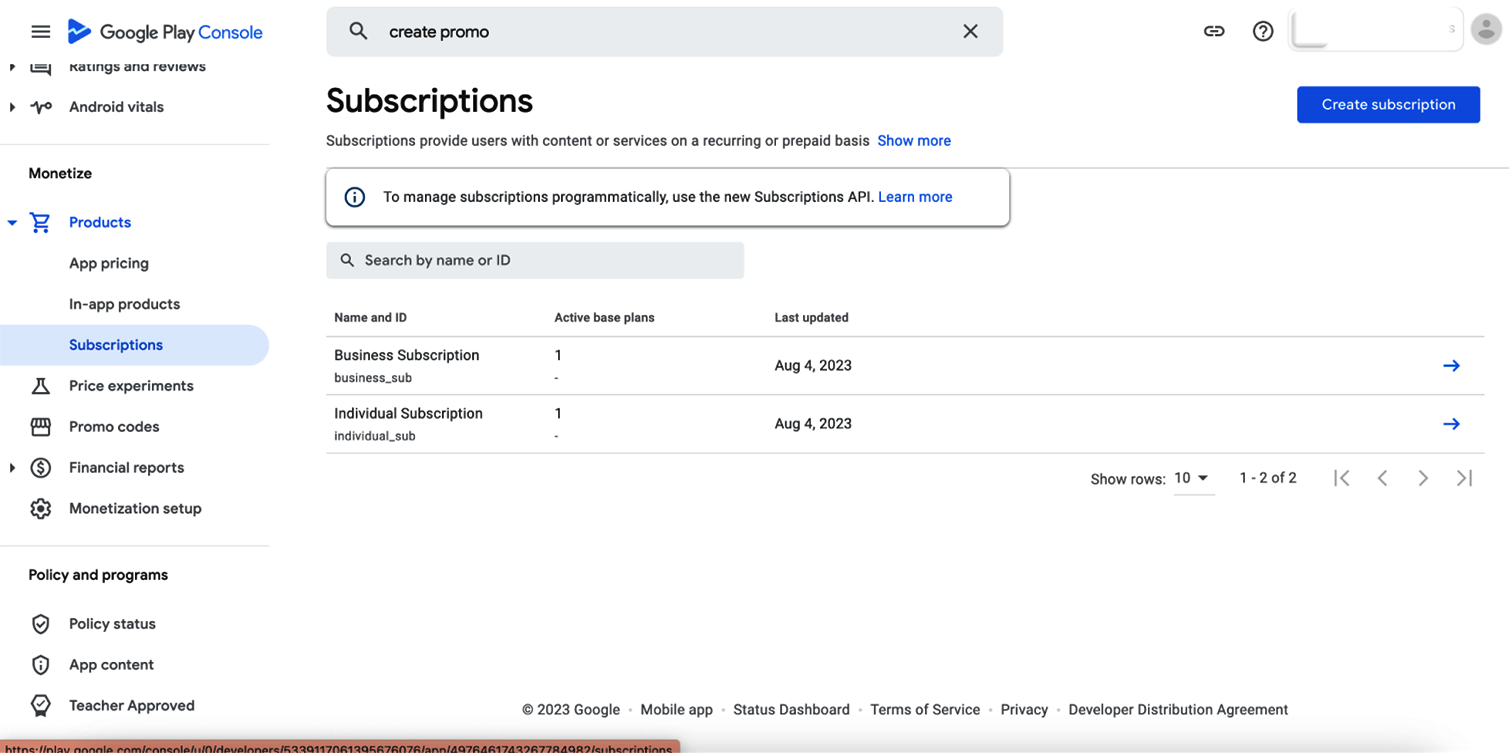
To implement in-app purchases and subscriptions, you need to:
- Define your products and prices in the Google Play Console
- Add the Google Play Billing Library dependency to your app project
- Implement the billing flow in your app code
- Test your implementation using test purchases
You can use the Google Play Console for the following operations:
- Manage your products and prices
- View and analyze your sales and revenue reports
- Offer promotions and discounts to your users
- Handle refunds and cancellations
- Comply with tax regulations
In-app purchases and subscriptions are a popular monetization method for app developers, as they can provide a steady and recurring source of income. However, they also require careful planning and execution, as well as providing value and convenience to your users.
You can measure the performance of your in-app purchases through a metric – Average Revenue per User (ARPU). It is calculated by dividing the total revenue your app generates by the number of active users.
According to Airship, the benchmark for an active user is around $0.04 per month. However, this number can vary depending on the location, industry, and pricing model of your app.
To increase your ARPU, you can:
- Change your prices and offer different options
- Make your app better and keep your users longer
- Make more users buy or subscribe and make fewer users leave
- Sell more products or services to your users
- Segment and target your users based on their behavior and preferences
Ad Revenue
Ad Revenue is another way to monetize your app using the Google Play Console. Ad revenue is the income earned by displaying third-party ads within your app. You can use various ad formats, such as banners, interstitials, rewarded videos, or native ads, to show relevant and engaging ads to your users.
To implement ad revenue, you need to:
- Choose an ad network or mediation platform that works well with your ad formats and gives you high rates of ad delivery and earnings
- Add the ad network or mediation SDK library to your app project
- Write the code for requesting and showing ads in your app
- Use test ads to check if your code works
- Upload your app and ads to the Google Play Store
You can use the Google Play Console for the following operations:
- Manage your ad settings and preferences
- View and analyze your ad performance and revenue reports
- Optimize your ad placement and frequency
- Balance your ad revenue with user satisfaction
Ad revenue is a widely used monetization method for app developers, as it can provide a passive and scalable source of income. However, it also requires careful optimization and experimentation, as well as respecting user choice and privacy.
To measure the ad revenue, you can use the eCPM (effective cost per mille) method. It is the amount of revenue your app earns per 1000 ad impressions. However, it depends on various factors, such as the ad format, ad network, app category, user location, device type, etc.
According to ironSource, the average eCPM for banner ads is $0.15-$2.00, for interstitial ads is $3-$6, for rewarded video ads is $10-$20, and for offerwall ads is $30-$50. However, these numbers can fluctuate depending on the supply and demand of the ad market.
To increase your eCPM, you can:
- Try different types of ads and networks.
- Make sure you have enough ad space and ads to fill it.
- Keep your users interested and loyal to your app
- Find out who your users are and what they like.
- Use mediation or bidding to get the best price for each ad view.
Chapter 8: Performance and Analytics
This chapter will teach you how to use different metrics and analytics tools to measure and enhance the performance of your mobile app.
Monitoring App Performance
App performance is an important factor that affects the user experience and satisfaction of your app. Poor app performance can lead to low ratings, negative reviews, high uninstall rates, and lost revenue.
To ensure your app runs smoothly, you need to check and improve its performance regularly. You can use the tools that come with the platform or the app store to monitor how your app performs.
For instance, Android Studio has a set of tools like Profiler, Memory Inspector, Network Inspector, and Energy Profiler that help you optimize your app.
Understanding Key Performance Indicators (KPIs)
Key performance indicators (KPIs) are measurable values that indicate how well your app is achieving its goals and objectives. KPIs help you evaluate the success of your app and identify areas for improvement.
You may have different KPIs that reflect your app’s performance depending on its nature and purpose. However, some of the common KPIs that are relevant for most apps include
- Active Users: This metric measures how many people are actively using your app on a daily, weekly, or monthly basis.
- Downloads: This metric shows how popular your app is by counting how many times it has been installed from the app store.
- Retention Rate: This metric shows how loyal your users are by counting how many of them come back to your app after their first time.
- Churn Rate: This metric shows how much your app loses users over time by counting how many of them stop using your app.
- Revenue: This metric shows how profitable your app is by adding up how much money it earns from different sources such as in-app purchases, subscriptions, ads, etc.
Apart from the KPIs mentioned above, there are some other statistics that can help you monitor and improve the performance of your app. These statistics are related to the technical aspects of your app such as stability, responsiveness, and compatibility. Some of these statistics are
- App Crashes: This statistic measures how often your app crashes or stops working unexpectedly. This indicates how stable and reliable your app is.
- ANR (Application Not Responding) Rates: This statistic measures how often your app freezes or becomes unresponsive to user input.
- Device Compatibility: This statistic measures how well your app works on different devices with different specifications such as screen size, resolution, memory, processor, etc.
Utilizing Analytics Tools
Analytics tools are software applications or services that help you collect, analyze, and visualize data related to your app’s performance. These tools can help you gain data-driven insights into your app’s users, behavior, preferences, trends, etc. They can also help you optimize your app’s features, design, content, marketing, etc.
There are many analytics tools available in the market that cater to the different needs and purposes of mobile app developers and marketers. Some of the popular analytics tools are:
- Google Analytics: Google Analytics is a free web analytics service that helps you track and report website or app traffic. Google Analytics can help you measure your app’s KPIs, user demographics, user behavior, user acquisition, user retention, etc.
- Firebase Analytics: Firebase Analytics is a free app analytics service that is part of the Firebase platform. It can help you measure your app’s KPIs, user demographics, user behavior, user acquisition, user retention, etc. Firebase Analytics can also help you integrate with other Firebase services such as Crashlytics, Remote Config, A/B Testing, etc.
- Mixpanel: Mixpanel is a paid app analytics service that helps you analyze user behavior and actions. It can help you measure your app’s KPIs, user demographics, user behavior, user acquisition, user retention, etc.
Integration with Google Analytics and Firebase Analytics
In this section, we will learn how to integrate Google Analytics and Firebase Analytics with your app. We will use Android as an example platform, but the steps are similar for other platforms as well.
Google Analytics
- To integrate Google Analytics with your app, you need to follow these steps:
- Create a Google Analytics account and a property for your app
- Add the Google Analytics SDK to your app project.
- Initialize the Google Analytics tracker in your app code.
- Send events or screen views to Google Analytics from your app code.
Firebase Analytics
- To integrate Firebase Analytics with your app, you need to follow these steps:
- Create a Firebase project and add your app to it.
- Add the Firebase SDK and the Firebase Analytics dependency to your app project.
- Initialize the Firebase Analytics instance in your app code.
- Log events or user properties to Firebase Analytics from your app code.
Chapter 9: Localization and Globalization
The localization and globalization of your Android app can help it propel to the top charts, enhance user engagement, and boost sales. Let’s understand these concepts in detail:
Expanding to International Markets
The Globalization of an app is the process of developing and designing the app to allow it to easily localize to any country’s culture and language. It is often termed “i18n.”
Unlike localization, internationalization strategies should be taken care of during the development phase. It includes developing a flexible framework that accommodates different scripts, languages, conventions, etc.
Here are some best practices to expand your app to international markets:
- Use String Resources
- Create Alternative Resource Folders
- Localize Images and Other Media
- Handle Plurals, Text Direction, and Formats
- Internationalize Your App’s Metadata Using ASO
Localizing Your App
The app localization is not just translating the language of the app; it is more than that. Your app should adapt to a different culture, languages, and other requirements of a specific market. This includes everything from adjusting time formats to converting the units of measurement to comply with the local regulations.
Additionally, localization includes translating and optimizing the metadata of your app, including its title, description, keywords, screenshots, etc.
The localized metadata is crucial for App Store Optimization (ASO) strategies. The Google Play Store’s algorithm prioritizes app metadata to determine its relevance to a search query.
Chapter 10: Security and Compliance
Security and compliance are two essential aspects of developing and publishing a mobile app on the Google Play Store. Here are some best practices and tips for ensuring your app is secure and compliant with Google Play policies.
App Security Best Practices
- Your app should protect the user data and the app itself from unauthorized access, modification, or disclosure. Some of the best practices for app security are:
- Use encryption to store sensitive data such as passwords, tokens, or personal information.
- Use HTTPS to communicate with your server and verify the server’s identity using SSL certificates.
- Consider using secure coding techniques to prevent common vulnerabilities such as buffer overflow, SQL injection, or cross-site scripting.
- Use code obfuscation and minification to make your app harder to reverse engineer or tamper with.
- Use Firebase App Check to verify that requests to your backend services are coming from your app
- Use Firebase Crashlytics to monitor and fix crashes in your app.
According to a report by Positive Technologies, the most common security vulnerabilities in mobile apps are insecure data storage (76%), insecure communication (35%), and insecure authentication (26%). The report also found that 43% of Android apps had at least one critical vulnerability.
Compliance with Google Play Policies
Your app should comply with Google Play policies, which are designed to ensure a safe and positive experience for users. Some of the policies that you should be aware of are
- Content policy: Your app should not contain or promote any illegal, harmful, or inappropriate content such as violence, hate speech, pornography, or gambling.
- Privacy policy: Your app should have a clear and transparent privacy policy that explains how you collect, use, and share user data. You should also request only the necessary permissions from users and respect their choices.
- Monetization policy: Your app should follow the rules and guidelines for monetizing your app through ads, in-app purchases, subscriptions, or other methods.
- Intellectual property policy: Your app should respect the intellectual property rights of others and not infringe on their trademarks, copyrights, or patents.
Chapter 11: Managing Multiple Apps
If you have more than one app in your Google Play account, you may face some challenges in managing them effectively. So, let us tell you some effective strategies to handle multiple apps in one account and use them to cross-promote.
Handling Multiple Apps in One Account
Managing multiple apps in one account can be tricky, especially if they have different target audiences, features, or monetization models.
Some of the strategies for managing multiple apps efficiently are:
- Use app bundles to reduce the size and complexity of your apps. App bundles allow you to deliver only the necessary resources and code to each device, saving storage space.
- Use Firebase to manage your backend services and analytics for your apps.
- Use Google Play Console to manage your app releases and updates. Google Play Console lets you create and manage different release tracks, such as alpha, beta, and production, and test your apps with internal and external testers.
Cross-Promotion and User Sharing
Having multiple apps in one account can also be an opportunity to cross-promote and share users among your apps. According to a study by AppsFlyer, cross-promotion increased the install rate of promoted apps by 167% on average.
Some of the ways to leverage multiple apps to promote each other are:
- Use app campaigns to advertise your other apps to your existing users.
- Use in-app promotions to showcase your other apps within your app
- You can use deep links to direct users to specific features or content in your other apps.
Conclusion
We hope this guide has helped you understand each aspect of Google Play Console, alongside creating a developer account, publishing an app, and maintaining it. It is crucial to understand that app publication is not the last step, you should have a well-planned marketing strategy to promote and distribute it to your target audience.
Once your app is published and accepted by the audience, ensure to analyze data insights to amplify your app’s reach. We know how overwhelming it can be for a business to develop and publish an app. However, the perfect solution is to reach out to the top mobile app development company and seek their guidance in developing an app that resonates with your app idea and your targeted audience.
FAQs
What are the fees associated with Google Play Console?
There is a one-time fee of $25 for setting up a developer account. Besides this, there are no other fees or charges associated with Google Play Console.
How long does it take to get an app approved on Google Play?
The average approval time for an Android app on Google Play Store is somewhere between 2-7 days.
Can I change my app’s package name after publication?
No, you can not change or modify the package name after publication as it is the unique name Identifier for your app.
What is the impact of app reviews on rankings and downloads?
According to the survey, 88% of people base their buying decisions on reviews and ratings. So, a positive review of your app will encourage other users to download it.
How do I handle copyright and trademark issues in my app?
To handle the copyright and trademark issues in your app, it is better to reach out to your developer. You can also raise a trademark complaint on Google Play Console.